I will go over everything you need to know about using the free bi-weekly budget template including where to put your income and expenses, how to use the income estimation box on the side, how to make new sheets within the spreadsheet, and how to copy the spreadsheet for a new year. You can see other free budget templates on our resources page.
When you get paid every other week, it is called bi-weekly. In a bi-weekly pay schedule, there are 26 pay periods. This means that in two months out of the year, you will have 3 paychecks instead of two. If your first paycheck of 2023 will be on Friday, January 5, your two months with an extra check will be in March and August. You can open your free bi-weekly budget template here. If your first paycheck of 2023 will be on Friday, January 12, your two months with an extra check will be in June and December. You can open your free bi-weekly budget template here.
I like to use google sheets for my budget templates because they are free, customizable, and don’t require any of my personal information. You can also convert google sheets into excel spreadsheets if you prefer to use excel. The great thing about this conversion is that you can do it without any loss to the formatting or calculations!
Where to put your income
There are two boxes for income in most months. There is an extra box for income in March and August for bi-weekly budget spreadsheet A, and for spreadsheet B, it is in June and December. The image below shows what those boxes look like.
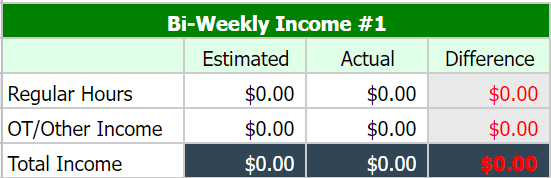
The first column shows the type of income it is, the second column is for the estimated amount you will receive, and the third column is for the actual amount you receive. The fourth column shows the difference between your estimated and actual amounts by subtracting your actual income from your estimated income. You can either use your current paycheck for the estimated column or you can use the income estimation box on the far right of the google sheet. The estimated income column is preset to use the income estimation box outcomes.
How to use the income estimation boxes
The income estimation boxes use your weekly hours and hourly rate to calculate your after-tax paycheck. It also includes a row for your 401k or other pre-tax retirement contribution that comes from your paycheck automatically. This row is preset for a 5% contribution amount but it can be adjusted to whatever percentage you personally contribute – or it can be changed to 0% if you do not participate in any pre-tax retirement plan.

This is what the income estimation box looks like for your regular hours. You start with your weekly hours and then enter your hourly pay. From there, it automatically calculates your weekly income, which shows at the bottom of the box. You can change the amount for your 401k by entering a new decimal amount in place of the current decimal. At the current preset of 5%, the equation looks like =-V11*0.05. To make it 3%, you would only change the 0.05 to 0.03.
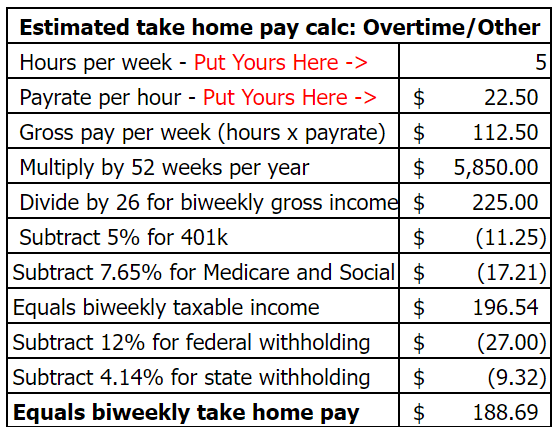
There is another income estimation box underneath the first one. This one can be used to calculate the amount you will make in overtime or if you have a second job. All of the customization rules for the first box also apply to the second box.
If you are using it for a second job, you will use it exactly like the first income estimation box. If you are using it to calculate how much you might make in overtime, you will type in the following equation: = Regular pay rate + (Regular pay rate/2). An example of this would be =15+(15/2). The cell will calculate this number for you, and then it will finish the calculation for the income estimation.
Where to put your expenses

Under the income section of the free bi-weekly budget template, there is a row that adds up your monthly income and shows the difference between what you expected to get for the month and what you actually made. Then below that is the expenses section. There will be two of these expense boxes – one for each pay period, and a third expense box will be in months that require it. They look like the box to the right of this text. Each of those categories are completely customizable to your needs, and I recommend budgeting for bills for the pay period following your paycheck. An example of this is if you have a bill on Monday and you get paid on Friday, then you would budget for that bill on the Friday before that Monday.
Just like with the income section, the expense section will show the difference between your estimated and actual expenses. As you get familiar with your expenses, you should be able to adjust your estimated amounts to be closer to your actual spending.
Underneath the expenses section, are two more sections. Directly underneath this section will be the expenses total summary section. This section shows your estimated expenses, actual expenses, and the difference between the two for the entire month. The last section is the monthly balance summary. This section shows your cash flow for the month – all of your expenses, all of your income, and then it will show you whether you spent more or less than you made for the month.
Google sheets tips
How to create more sheets within an existing spreadsheet.
If you need to make more sheets within the existing sheet, you start by right-clicking on one of the months at the bottom. This will show some options, and the one you need to click on is “Duplicate”. Then you can click and hold onto that sheet to move it to where you need it. Doing this will copy an existing sheet but keep it in the same document.
How to make an entirely new sheet for the new year.
If you need to make a new spreadsheet, you will start by clicking on “File” at the top left of the page. Then you will click “Make a copy”, which you will see in the first section of the drop-down menu. After that, you will see a pop-up with an option to rename the new sheet you are creating, as well as move it to a new place in your drive – if you so desire.